Archives for Getting Started

Step One: Learn How to Access your Website

Estimated Time to Complete this Section: 3 Minutes
TIP: Open Two Tabs/Windows. It’s much easier.
To make the most out of this Quick Start Guide, we suggest that you open two windows (or tabs). One window should have your new Digital PTO website open to the Admin Screen and the other window should be this guide. If you do not have your Admin Screen open, we will explain how to open it below.

Learning how to Access your new Website

This first tutorial will teach you how to log into your website and what functions are available on the Admin Tool Bar.

Understanding your website’s Administrative Side

It is important to know that you must be logged in to your website in order to make any edits or changes. If you are already logged into the Digital PTO network, you will see your username and a tool bar at the top of every page on our network. If you are not logged in, you can log in right now on the Right Side of this Page in order to activate your Admin Toolbar.

Your Admin Toolbar in Live Mode

live-adminbar

If you are logged into your Digital PTO account, you will see an Administrative Tool bar added to the very top of your website. This toolbar is EXTREMELY handy and will be your main door to the back end of your website. The tool bar allows you to edit a specific page, add new news, add an info page and access your Dashboard (the Administrator Homepage) all with one click.

Your Admin toolbar will change based on the Page and Website you are on. For example, when you are on this Quick Start guide, you have a limited menu because you are not able to edit this page. If you look at your admin bar on your own Digital PTO website, you will see additional options similar to those in the image above.

Your Admin Tool Bar in Admin Mode

admin-adminbar

You will also see the admin tool bar when you are in your Admin Mode (Edit Mode). Again, the options and functionality will change based on the page you are viewing.

Logging in: Digital PTO Home Page

signin-mainpage

If you are currently not logged into your website, the first thing you will need to do is log in. There are a number of ways to do this. The easiest way is to go to DigitalPTO.com and click the SIGN IN link in the upper right corner. 

Logging in: From your website

login-live

If you haven’t made any changes to your widgets/sidebar, you can also log in by visiting your own website and scrolling toward the bottom, you will see a section in the sidebar called USER LINKS. In that section, click the LOG IN Link.

The Log In Screen

login-screen

When the login screen opens, please enter your username and your password and you will be taken to the admin end of your website.

IMPORTANT: You only get three chances to log in with the incorrect information (username or password) before you will be locked out of the system for 12 hours. Please be aware of this when you are logging in and try to avoid guessing if you don’t remember your login information.

Your Admin Dashboard

dashboard-summary

Your Admin Dashboard has three main areas.

The Admin ToolBar is up top and it gives you access to your live site, your editor, let’s you add News Posts and Info Pages and also gives you quick access to upgrading your site to a Premier Plan.

The Admin Menus are on the left side and provide links to every administrative aspect of your website.

And finally, the Main Content Area. This area will change depending on what you are doing with your website. This is where you will add content, adjust settings and more. The main content is where you will be entering the majority of your information on new pages and posts.

Step Two: Update your “Calendar” Page

Estimated Time to Complete this Section: 5 Minutes

Understanding the difference between Informational Pages and News Posts

This tutorial is going to introduce you to the pages on your website that are across the top navigational bar. Before we do that though, we need to explain the difference between Info Pages and News Posts. Info Pages are pages on your website that you always want your visitors to have access to. These can include Contact Pages, Info Pages, Volunteer Pages, Join the PTO Pages, etc. News Pages on the other hand are dated and are constantly getting replaced by more recent News. The links in your main navigation bar almost always lead to Info Pages and the content in the center of your page is almost always News Posts.

Accessing your list of Informational Pages

accessing-all-pages

Now that you understand the difference between Informational Pages and News Posts, it’s time to take a look at the Info Pages we have already added to your website. We have added the pages that a typical PTO / PTA would want if they were members of the Premium Plan. If you are a member of the free plan, you may want to edit, remove or hide some of these pages depending on your particular needs.

To access a list of all of your Informational Pages from your Admin Dashboard, hover over the PAGES menu and then click ALL PAGES.

Your Informational Pages

infopageall

Once you click the ALL PAGES link, you will be taken to a page that list all of the informational pages you have on your site. By Default, we have installed the following pages for you:
  • Events Calendar
  • Info
  • Join
  • Contact Us
  • Volunteer

You are welcome to add to these pages, move them, delete them, etc. If you are planning on becoming a Premium Member soon, please keep these pages in tact as they will be used (and edited) when your premium services are installed.

Editing an Informational Page

clickcalendartitle

In this tutorial, we are using the Events Calendar, so we’ll go ahead and edit that page. Click on the title of the page called Events Calendar and that will take you to the Editing Screen.

The Calendar Edit Screen

editor-overview

Don’t be overwhelmed by this page, there are actually very few things you need to know to make simple edits on a page. The elements are the Title Field, the Content Field and the Publishing Tools.

If you are planning on becoming a Premium Member soon, there is no need to edit this page as we will be adding your calendar for you and deleting the extra content when you upgrade. So please leave this page alone if you are upgrading.

If you are not upgrading, feel free to edit this page and make a list of your upcoming events, information about your schedule, etc. You can also delete the page if you don’t want to use it. We’ll explain that below.

Understanding your Calendar Page

calendar-live

An updated Events Calendar is the cornerstone of any Parent Group and this page was built to provide you a place to promote those events and activities. If you becoming, or already are, a Premium Plan Member, this is the location that we will install your built in calendar. If you are not becoming a Premium Member, this is where you can type out information about your events.

There are 4 scenarios possible with this page, we will explain each one in detail below.

  1.  You plan on becoming a Premium Member and want to use this page for your calendar. If this is the case, do not edit this page.
  2. You want to hide the page from the public, but do not want to delete it. This is a great option if you are planning on becoming a Premium Member in the future or if you don’t know if you want to use this page yet, but want to save it just in case. If this is the case you will want to use the Private Option described below.
  3. You do not ever want to use this page and want to delete the page.
  4. You plan on using this page, but not as a Premium member, so you want to Edit the page.

Scenario 1: You are becoming a Premium Member

leaveitalone

If you are planning on becoming a Premium Member, you can completely ignore this page. We will get rid of all the demo images for you and install your calendar as soon as your payment is posted. You can skip to the next section!

Scenario 2: You Want to Hide the Page

private-edit

If you would like to hide the Calendar Page from the public it is very simple. First, you want to click the EDIT link next to Visibility Public in the Publish Settings.

provate-selection

Next Select PRIVATE and click the OK Button.

private-update

Now you can edit the page as you would like (or leave it alone).

If you would like to learn more about Editing a Page, please visit this tutorial on Formatting News & Info Pages.

Be sure to click the UPDATE Button to save your changes. If you mark a page as Private, only website administrators can see it and it will be hidden from the general public.

Scenario 3: Deleting the Page

delete

If you are not planning on ever using the calendar page, it’s probably best to just delete it. It is very simple to delete a page, when you are editing the page, click the MOVE TO TRASH link in the Publish Settings and you’re done. 

Be sure to remove the Menu Link!

gotomenus

You will also need to remove the link in the main navigation menu to the Events Calendar if you hid or deleted your calendar page so that you don’t have a broken link in your menu. To do this, go to APPEARANCE > MENUS.

expandmenu

Click the downward arrow to the right of the Calendar Menu Bar to expand it.

remove-save

Once the Menu has expanded you will see the REMOVE link. Click that link to remove the calendar link and then click the SAVE MENU button and you’re set.

Scenario 4: Editing your Calendar Page

If you want to Edit your Calendar Page, please feel free to do so. We have a complete guide to editing pages that can be found in our Help Center.

Step Three: Update your “PTO Info” Page

Estimated Time to Complete this Section: 5-10 Minutes

Adding Content to your Info Page

The PTO / PTA Info Page is designed to be the Hub of information about your Parent Group. You can enter information about your groups mission, you can enter your Board Member Info, it’s really up to you. Just think about what you would want to see as a visitor to your site when you click on the  Info link and that’s what you should type in.

Please Note: We understand that you may not be ready or able to type in your actual content right now. It’s ok to enter some “fake” information at this point. The goal is to learn how to use your site, you can worry about the details later if you want.

Click on PAGES > ALL PAGES

accessing-all-pages

We want to get to your list of Pages again, so hover over PAGES and then click ALL PAGES to get to the screen with your Info Page.

Click the INFO Page Title to Edit

clickinfotitle

Click on the Title of the Info page and that will open the page in the editor.

Edit your Page and Update

edit-update

When the editor opens, go ahead and make any changes you would like to this page. You can delete the existing content, or edit it to suit your needs. If you would like to learn more about the specifics of Editing a page, please click here to view that tutorial.

Step Four: Update your “Volunteer!” Page

Estimated Time to Complete this Section: 5 Minutes

Updating the Content on your “Volunteer!” Page

At Digital PTO, we have found time and time again that the more information you can provide on your parent groups website, the better chances you have of volunteer participation. We have added a Volunteer page for you to outline all of the volunteer opportunities your group offers.

Premium Members have the added benefit of an Online Volunteer Sign Up Form!
View a Live Demo of the Volunteer Form

Please Note: We understand that you may not be ready or able to type in your actual content right now. It’s ok to enter some “fake” information at this point. The goal is to learn how to use your site, you can worry about the details later if you want.

Click on PAGES > ALL PAGES

accessing-all-pages

To access your list of pages, click on the PAGES > ALL PAGES menu item.

Click the Volunteer Title to Edit

clicktitle

Click on the title of the Volunteer Page to go to the page editor.

Note to Premium Members

leavalone

If you are planning on becoming a Premium Plan or Premium Plus Plan member please leave this page in tact so that we can install your Online PTA / PTO Volunteer Form here. No need to make any changes until your site is upgraded.

Edit Page as Desired

editpage

If you are not planning on upgrading your site, you will want to edit this page. We pre-populate it with some info about the Volunteer Forms so go ahead and delete all of that and you can add your own content. Need help with formatting? Read our Formatting Guide Here.

Be sure to UPDATE to Save

update

When you are finished with your edits, be sure to click the UPDATE Button to save your changes!

Hiding or Deleting the Info page

If you would like to hide your info page or delete your info page, please refer to the instructions on how to hide or delete your Calendar Page found here.

Step Five: Update your “Contact Us” Page

Estimated Time to Complete this Section: 5 Minutes

Adding Content to your Contact Us Page

Your Contact Us page will be a very important page for your PTA / PTO. It is important to put the current contact information you have for your group at the top of this page. Try not to clutter this page with too much information. Make it easy for parents to get a hold of you.

Premium Members have the added benefit of a Premium Contact Us Form!
View a Live Demo

Please Note: We understand that you may not be ready or able to type in your actual content right now. It’s ok to enter some “fake” information at this point. The goal is to learn how to use your site, you can worry about the details later if you want.

Your PTO / PTA Email Address

If you do not have an email address set up specifically for your PTA / PTO, we highly suggest that you do that. Parent Groups are transitional as members come and go, so it is important that the email address for your PTA / PTO be tied to the group and not an individual. If you do not have an email address for your group yet, you can set one up for free with a service like Gmail.com in just a few minutes.

Click PAGES > ALL PAGES

accessing-all-pages

Hover over PAGES and then click on ALL PAGES to access the list of pages on your site.

Click on the Contact Us Title

clicktitle

Click on the title for the Contact Us page.

Edit the Contact Info as Needed

editpage

When your Contact Us page opens you can edit the information as desired.

If you are planning on becoming a premium member, don’t forget you will receive a built in Contact Us form on this page so please do not delete the code.

You are welcome to edit the contact information up top. Be sure to UPDATE the page when you are finished.

Step Six: Update your “Join the PTO” Page

Estimated Time to Complete this Section: 5 Minutes

Providing Opportunity & Reason to Join your PTO / PTA

It is amazing how many parents will sign up and support a Parent Group as soon as they are asked a few times. Digital PTO was founded on the idea of allowing parents to register for the PTA online. We saw existing PTA’s entering data manually after parents filled out a PIECE OF PAPER! and knew we had to step in and help. Your Digital PTO “Join” Page should explain to parents and potential business members why joining the PTO / PTA is important and how to go about joining.

Premium Members have the added benefit of built in Online Family Registration Form!
Click Here to See a Live Demo of the Family Registration Form

This is one of the pages where the Premium Plan Membership really shines. Imaging sending all of your families a link to register for your group online and then being able to collect that data in bulk (an additional fee applies for the downloads, but we’ll get into that later) and download it. If your PTO / PTA has access to laptops or computers, you can have parents register at school registration events directly on your website! It’s really quite amazing.

Please Note: We understand that you may not be ready or able to type in your actual content right now. It’s ok to enter some “fake” information at this point. The goal is to learn how to use your site, you can worry about the details later if you want.

Go to PAGES > ALL PAGES

accessing-all-pages

Hover over the PAGES menu item and click on the ALL PAGES link

Click on the Title of the Family Registration Page

clicktitle

Click on the TITLE of the Family Registration Page to Edit it.

Edit the Fields as Desired

updatesave

Edit any information you wish to change on this page. Make sure to tell people how to register for your Parent Group is you are not offering a registration form online.

If you are planning on becoming a Premium Plan Member, please leave this page alone as it will serve as the location to display your Family Registration Form.

When you are finished editing, be cue to click the UPDATE button!

Step Seven: Learn About Widgets & How to Use Them

Estimated Time to Complete this Section: 5-10 Minutes
We have a brand new tutorial Introducing you to Sidebars & Widgets. Clicking the link below will open the tutorial in a new window/tab and you can close it to come right back to this page.

Learn All about SideBars and Widgets Here 

Step Eight: Update Sidebar Welcome Message & Image

Estimated Time to Complete this Section: 5 Minutes

Customizing your Welcome Message & Image or Logo

Digital PTO makes it easy to add a text welcome message as well as upload an image (or as many as you would like) to your Sidebar. You will want to change your Sidebar Welcome Message as well as upload a photo of your school or even your schools’ logo.

Live Website Reference: Welcome Message & Photo

livereference

This tutorial covers changing the welcome message and image at the top right of every page on your website. Above is the example of the default set up.

The message and image are located within your widgets as explained below.

Go to APPEARANCE > WIDGETS

gotowidgets

To Access your Widgets, head to APPEARANCE > WIDGETS

Click the Downward Arrow on Welcome Families Widget

expand-welcome

Click the arrow to the right of the Text: Welcome Families Widget. This will expand the widget for editing.

Make any changes desired

edit-welcome

Feel Free to change the Title and Content of this field. Try to keep the text field to a maximum of 3 lines for best appearance. When you are finished, click the SAVE button to record your changes.

Click the Arrow Again to Shrink the Box

shrink-welcome

Click the downward arrow again to shrink the box back up.

Click the Arrow next to Image Widget

expand-image

Click the downward Arrow to the right of the Image Widget now. This will expand the image widget options.

Click Select Image to Add New Image

image-selectimage

Click the SELECT AN IMAGE button to select a new image. This works well as either your school logo or a photo of your school.

In Upload Screen, Click Select Files

image-selectfiles

Be sure you are in the Upload Screen (you probably already are) and then click the SELECT FILES Button. This will open up a window to allow you to find the photo you with to upload on your computer. When you find the image you wish to use, click OPEN.

Verify Image and click Insert Into Widget

insert-image

Once your image uploads, make sure it’s the right image and then click the INSERT INTO WIDGET button.

Note: Don’t worry if your image is too large, we’ll adjust that shortly.

Change Title as Desired

change-title

Change the Title of the Image if desired.

Change the Caption as Desired

caption

Change the text that will appear under the image (CAPTION) as desired. Keep it short!

Change Link as Desired

changelink

By default, the image will link to a larger version of the image when you click on it. If you would like to change where clicking on the image leads, you can enter it in the LINK field.

Change SIZE to CUSTOM

size-custom

More than likely, your image is too big to fit in the sidebar, so change the Size option to CUSTOM. This will allow you to enter your own dimensions.

Change the Width to 240

width240

If you are using the default Starter 2012 theme, they you want to make your Image Width 240. The Height will automatically change based on your width settings. If you are using a different them you may have different dimensions that will fit better.

Set the Alignment to CENTER and SAVE

aligncenter

Make sure your Align setting is set to CENTER and then click the SAVE button to record your changes.

Review your changes

livereference

Head to your live site and make sure that the changes you just made look right! If they are correct, you’re ready to move on to the next step!

Step Nine: Update the “Links” on your website

Estimated Time to Complete this Section: 5 Minutes

Adding & Removing Links to other Websites

PTA’s and PTO’s typically have a lot of other groups that they work with (schools, districts, etc) as well as other information they might want to provide links to. Digital PTO makes it easy to collect and display links to your visitors. This tutorial will walk through setting up a link to your school’s website as well as deleting a block of links from your sidebar. This is not a link within a page or post, but rather a specific set of links that can be added to your sidebar.

Live Website Reference: The Links

liveview
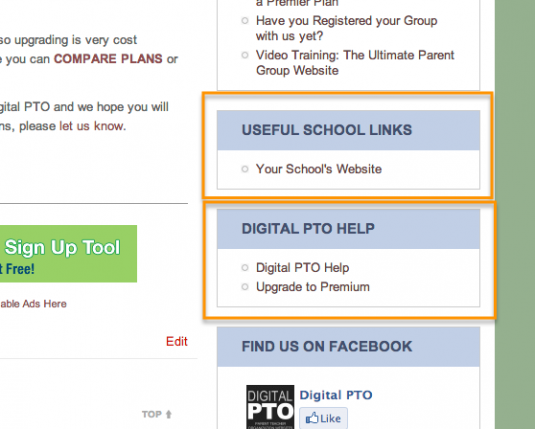
This tutorial covers changing the links that have been pre-added to your website. You will add a link to your school website and also learn how to remove a set of links. The default links are shown above for your reference.

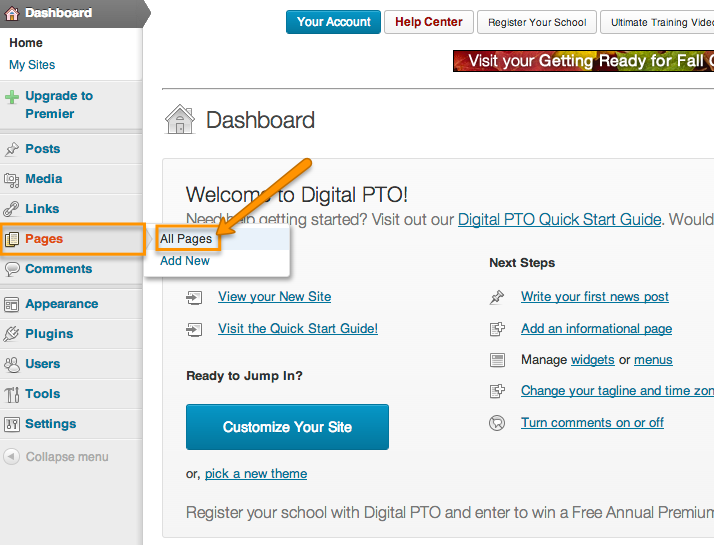
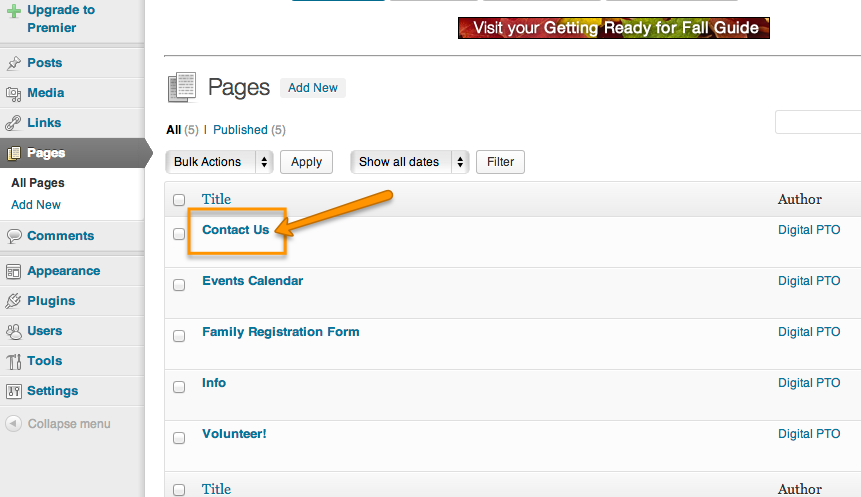
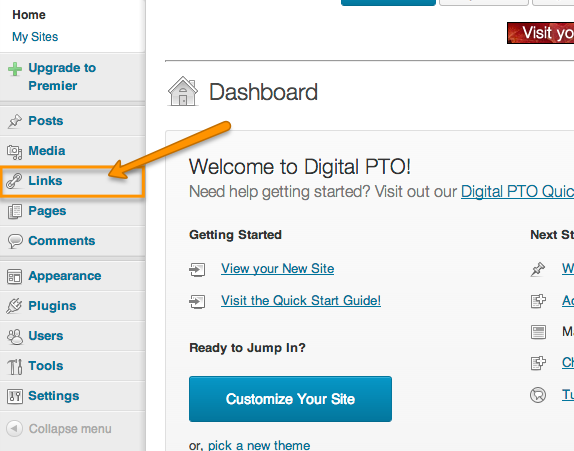
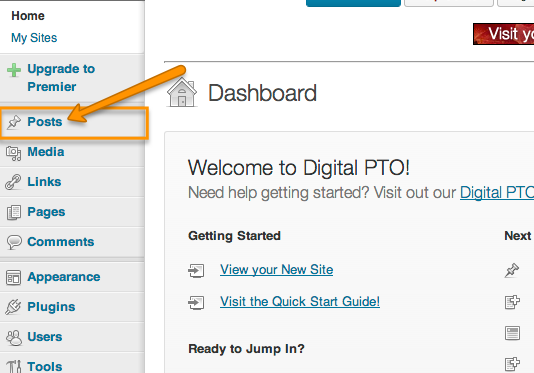
Click the Links Menu

clicklinks

Click on the LINKS menu option to open your current list of links.

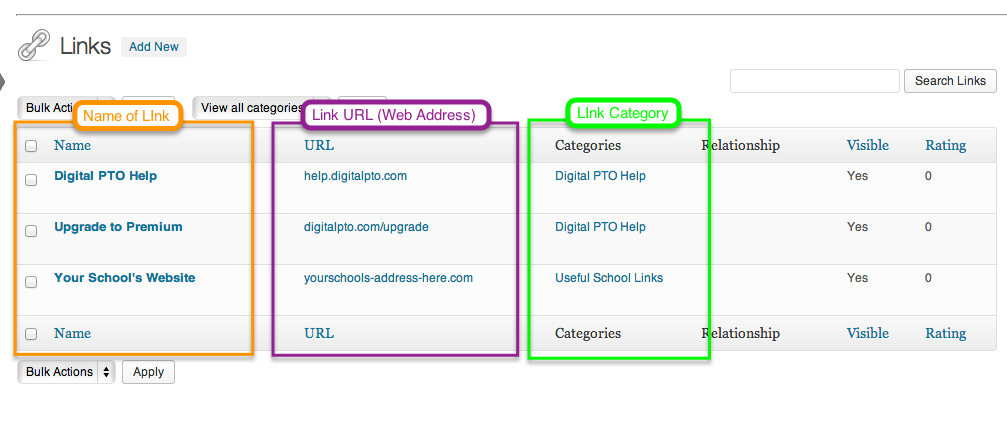
The Links Page Overview

linkoverview

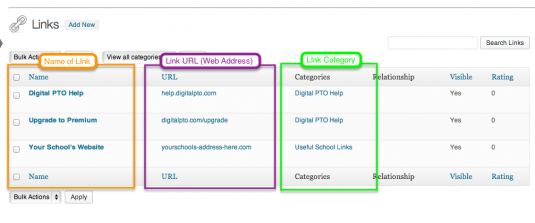
The main Links Page lists all of your current links. You will see the name of the link (displayed on the website), the URL (web address) of the link and the Category of the links (important for sorting)

Editing Your Schools Website Link

clickschooltitle

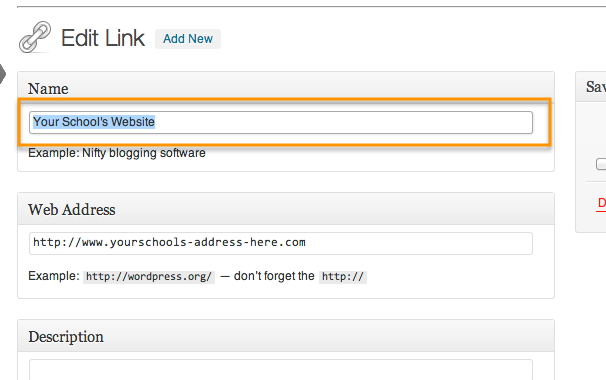
Let’s start by editing the link to your schools website. To Edit the link, click on the title that says YOUR SCHOOL’S WEBSITE.

Change the School Name as Needed

schoolname

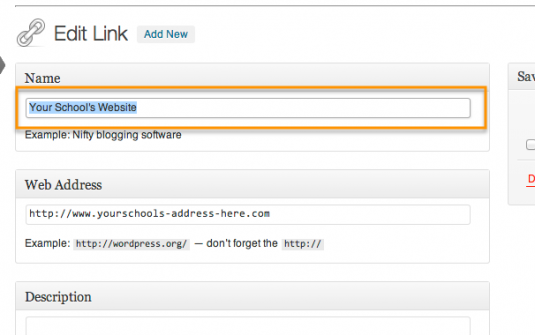
When the editor opens you will see a variety of options. Let’s start with changing the name of the link to better match your school. Enter something like Marshall Elementary Website.

Change the Website Address for your School

schoolwebsite

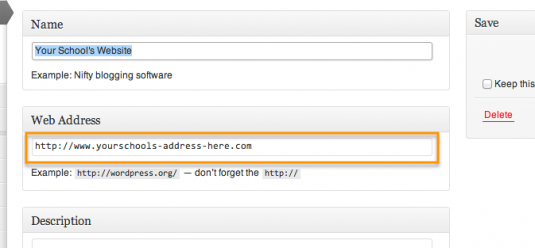
Next you want to paste in the website address (URL) for your school.

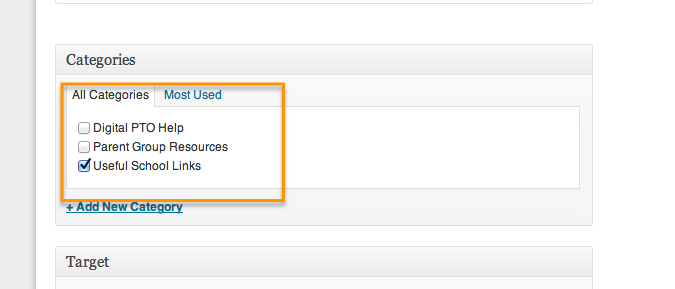
Change Category if Needed

schoolcategory

You will also want to determine the Category for this link. By default, we have assigned it to Useful School Links, but you can change that if you want. We will teach you about adding categories further below. Categories are IMPORTANT because when you create a widget to display your links, you’ll specify which category to display, so be sure to organize them properly.

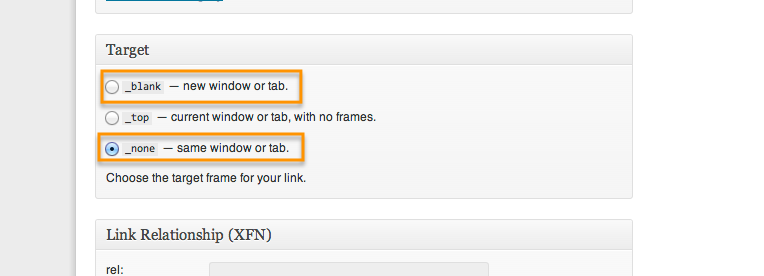
Modify your Target if Desired

schooltarget

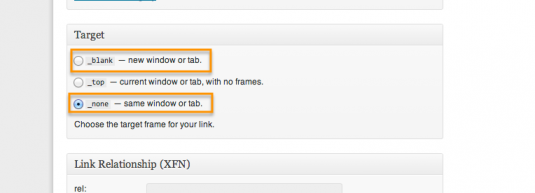
There are a few TARGET options available to you. This is determining how the link will function when it is clicked. The two most common options are NONE which just means the page will lead to the link you click or BLANK which means that a new window will be opened to display the link when clicked so that you don’t lose your place on your website after the new window (or tab) is closed. The default is NONE, but feel free to change it to TOP if you would prefer.

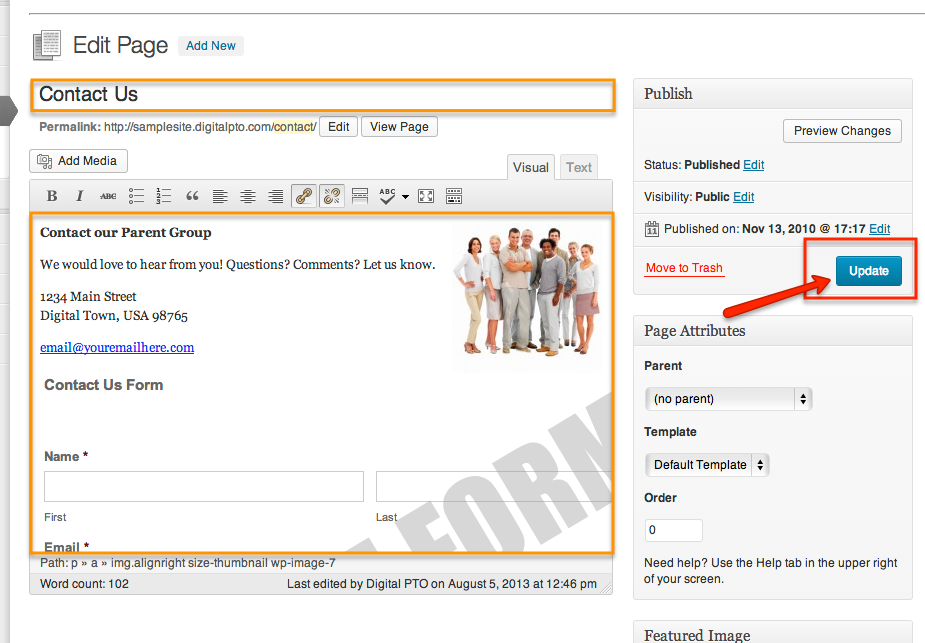
Finally, Update your Link

schoolupdate

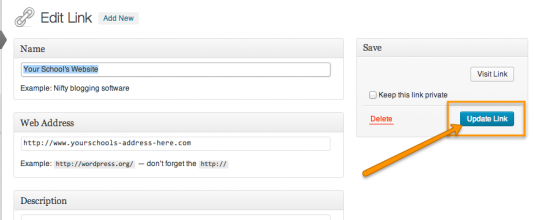
There are a number of advanced options that you are welcome to adjust, but the rest of the options are unnecessary. Once you have made your changes, be sure to click the UPDATE button to record your changes. This will return you to the main links page.

Deleting a link

deletelink

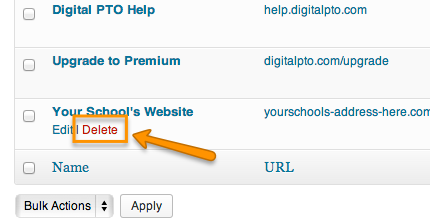
If you want to delete a particular link, hover over the Title of the link and click the DELETE button.

Adding a New Link

addnewlink

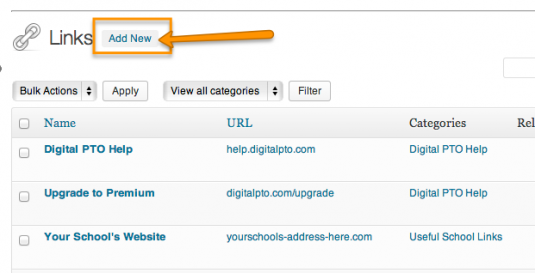
To Add a New Link, click the ADD NEW button up top and follow the steps above (title, web address, category, etc)

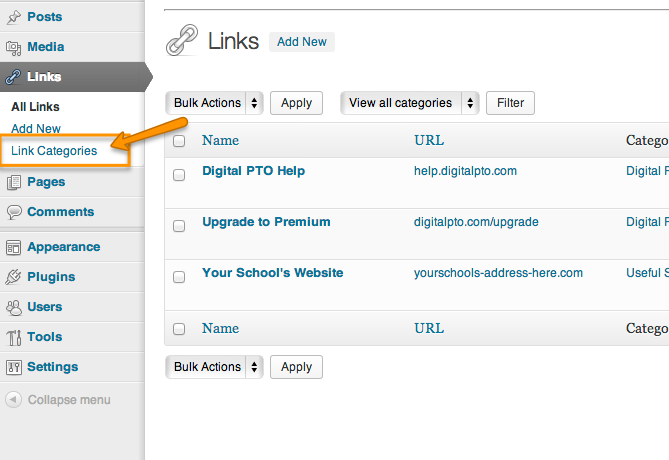
Adding New Categories

clicklinkcategories

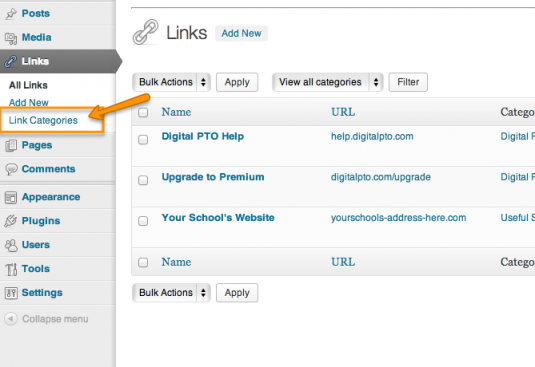
If you would like to add New Categories to your link options, click the LINK CATEGORIES option in the Links Menu.

Enter the Name for your Category and ADD

addcategory

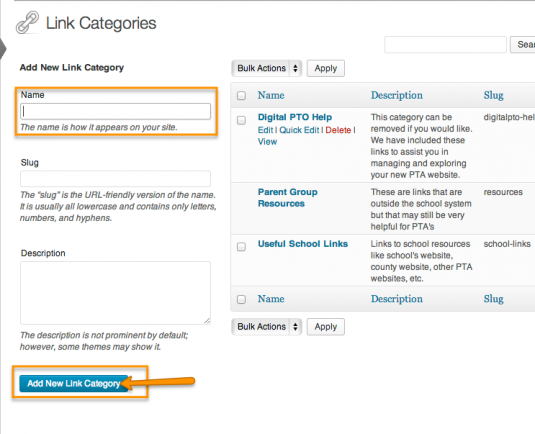
To add a new category, give the category a Name (keep it short) and then click ADD NEW LINK CATEGORY
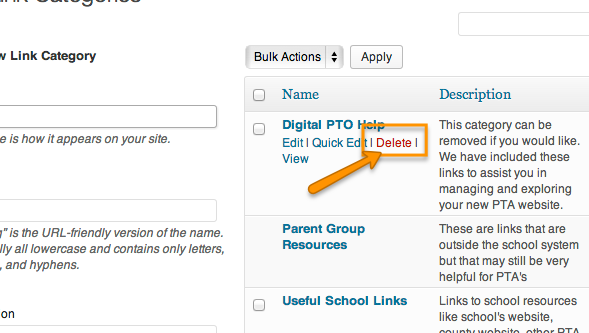
Deleting a Category

deletecategory

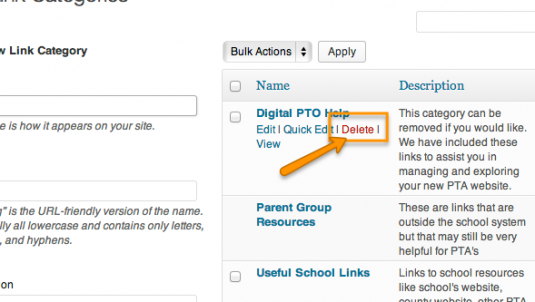
If you want to Delete a current Link Category, hover over the Title of the Category and click the DELETE link that appears.

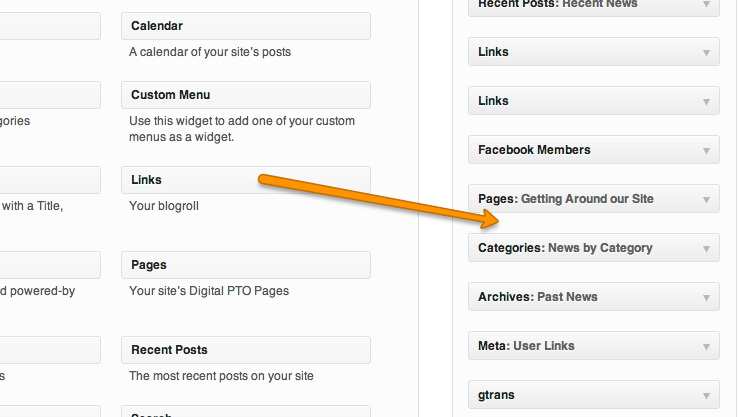
Links and your Sidebar

accesswidgets

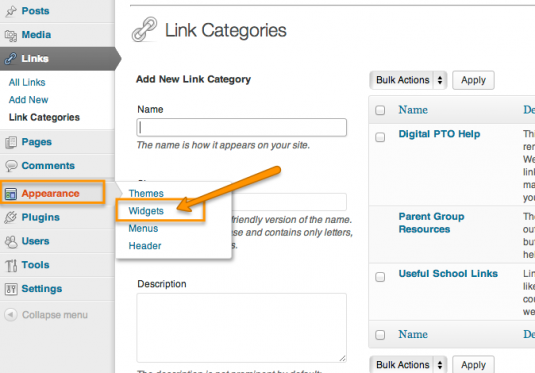
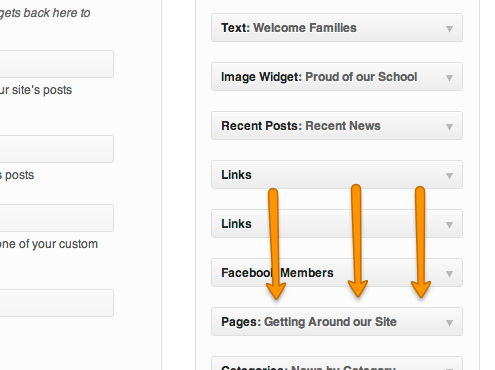
The links in your sidebar are controlled by the Links Widget. To access the Widgets go to APPEARANCE > WIDGETS

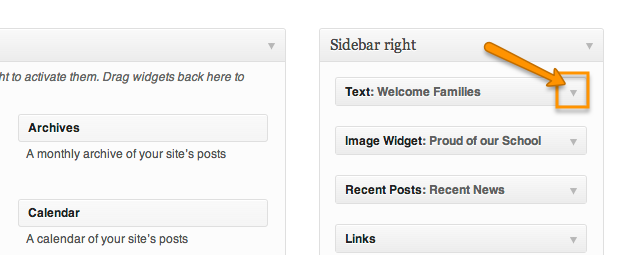
Changing Current Links

expandlinks

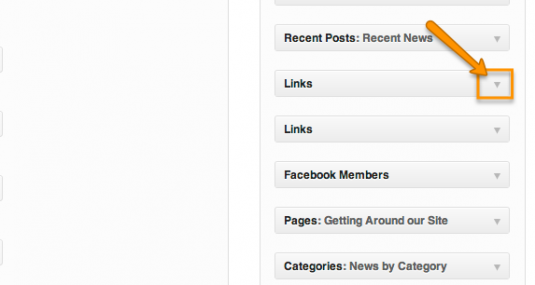
By Default, we have added two Link Widgets to your Sidebar. They are the Useful School LInks and Digital PTO Help. To Open the Links Widgets options, click the downward arrow next to the link widget you want to Edit.

Make Changes as Needed

changewidget

If you want to change the link Category or anything else on the links, feel free to do so. Be sure to click SAVE when you have finished your changes.

Deleting a Links Widget

deletewidget

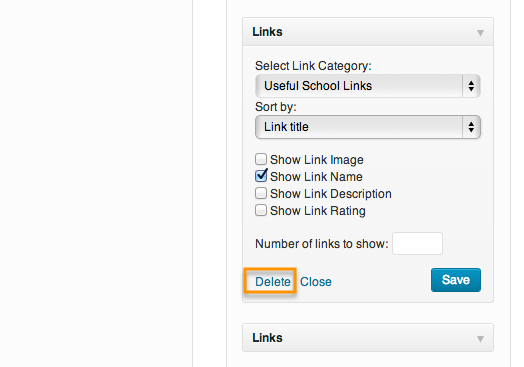
If you want to DELETE a widget from your sidebar, click the DELETE link at the bottom of the widget.

Adding a New Links Widget

addlinkswidget

If you want to add an additional Links Widget, simply drag the links widget from the center over to your desired location on the sidebar. You can edit as desired and then remember to click SAVE.

Moving Links Widgets Around

movewidgets

You can quickly change the positioning of the links widget by dragging it up or down on your sidebar to a new location.

Step Ten: Add a News Post

Estimated Time to Complete this Section: 5-10 Minutes

It’s finally time to add a News Post to your site!

Congratulations on making it this far in the Quick Start Guide! You’re almost finished! It is now time to add your very first news post to your PTO / PTA Website! As we mentioned before, if you don’t have actual content to add at this point, feel free to add some fake content that you can edit and adjust later.

Click on the POSTS Menu Item

clickposts

To access a list of all of your News Posts, click the POSTS link in the main menu.

Add a New Post

addnewpost

There are three different ways to add a New Post. You can click the ADD NEW link in the Posts Menu, you can click the ADD NEW Button at the top of the post page, or you can also hover over the + NEW link in your Top Admin bar and select POST from the drop down. They all go to the same place so pick your favorite way to start a new post.

Enter the Title for your Post

entertitle

When the New Post screen opens, the first thing you’ll want to do is enter a Title for your News Post.

Enter the Content of your Post

entercontent

Now you’ll want to enter the actual content for your post. You can add as much or as little as you would prefer.

We are not going to go over formatting basics in this tutorial, but we do have a complete Guide to Formatting Posts and Pages that can be found here if you would like to learn about Bolding text, Bullet points, colors, etc.

Add an Image to your Post

addimage

We highly suggest adding Images to your News Posts as they are much more interesting to your readers that way. We have an entirely separate tutorial created on How to Add an Image to a News Post. This will open in a new window so you can come back here when you are finished.

Assign a Category to your Post

addcategory

Assigning a Category to your post is a good idea because it will help the readers navigate your posts in a variety of ways. It will also allow you to filter your posts on more advanced themes and it is best-practice to assign a category.

If you want to add a new category, click the + Add New Category link and specify your new category for the post.

Save, Preview or Publish your Post

publish

In the Publish settings, you will see three buttons. You can SAVE DRAFT which will save your changes but not push your post to the live website, you can PREVIEW your post which will open up a live preview of your post to review, or you can PUBLISH your post to make it live on your website. When you are ready, go ahead and PUBLISH your post and you have completed posting your first News Post! Congrats.

Additional Documentation On Posts

If you would like to learn more about working with news posts, we would suggest visiting our “How To” Guides in the Digital PTO Learning Center as they are loaded with information about working with posts.

Step Eleven: Hide the News Posts we added for you

Estimated Time to Complete this Section: 1-2 Minutes

Cleaning up your News Posts for your Community

You are virtually finished with the basic set up for your PTO / PTA Website! Congrats! The last major thing you will need to do is hide the News Posts we added for you. You may want to access them again in the future (especially as your board changes!) but you don’t want to make them a part of your school’s news. This tutorial will show you how to hide those posts and make them private, only available to the Administrators of the website.

Click POSTS to Open List of Posts

clickposts

Click on the POSTS option in the Admin Menu to open up a list of all of your posts.

Hover over the Title and click Quick Edit

quickedit

Find the first post you wish to hide from the General Public. Hover over the Title of the post and you will now see an option called Quick Edit below the title. Click QUICK EDIT.

Click the PRIVATE box and Update

private

When the Quick Editor opens, click the box next to PRIVATE and then hit UPDATE

Your Post is Now Private

itsprivate

You will notice now that you posts is marked as Private. This means that only administrators of the website will be able to view it. If you log out of your website and view your site as a normal visitor, you will not see the private (hidden) posts.


Step 12: Facebook Facepile Widget

Working with the Facepile Facebook Widget

Every Digital PTO website comes with the ability to promote your pta or pto groups facebook page quickly and with ease. We have created a tutorial that explains exactly how to work with the widget in our Help Center. Visit the Facebook Widget Training Here.

You may also delete the widget if you would prefer not to use it.

The Google Translate Widget

Your website comes with the ability to translate your site to a different language built in! It’s a simple widget you can add to your side bar. Feel free to keep the Translation Widget where it is, move it around or remove it completely.

Please keep in mind that this is a machine translation, so translation is subject to the abilities of Google’s Translate Technology.

For more information about working with Widgets, please visit our Widget Introduction Training.

Register your Group with Digital PTO

If you have not yet registered your Parent Group with Digital PTO, please take a moment to complete that process. Registering your school will qualify you for entry into the drawings we hold for a Free Annual Premium Plan, so it’s worth the few minutes to register.

Registration with Digital PTO is also the foundation of our Digital PTO Giving Program that will be providing grants, discounted or free premium service and more to qualifying schools. Whether your school needs assistance or you have a program that you would like Digital PTO to support, registration is the first step.

Registration will also give you pre-release registration access to local Digital PTO trainings, events and seminars.

Zen and the Art of PTO Website Maintenance

Congratulations! You have completed the most basic elements required to get your website ready to announce to your community. If you are anything like us, you probably want to keep pushing forward, learning more, and creating more.

Take a break for a while. You earned it. Even if only for a moment.

Once you have given your eyes and mind a rest, here is a preview of what you may want to work on next.

  1. Are you ready to become a Premium Member & add more functionality to your site?
    (Compare Plans or Upgrade Now)
  2. Explore some of our more advanced “How To” guides and take your website further
    (View our How To Guides)
  3. Start to explore your theme options and how to use them
    (View our Intro to Themes Tutorial)

Are you a Perfectionist? Read this.

A special note to our fellow perfectionists:

Please remember that a website, and especially a news based website like yours, is a living thing. It will constantly be changing, evolving and growing. Don’t stress to much about the little things, nothing you do is permanent, you can always change your settings multiple times as you see need. If you worry about making things perfect before you launch, chances are, you’ll never launch.

Get the basics set up, get the word out there about your new website and then continue your learning and development on the site.

The Top Five Basic Digital PTO Design Philosophies

At Digital PTO, we believe in clean and consistent designs. We would advise PTO’s and PTA’s against using a lot of different colors and fonts which is a habit for new website users. Instead, we would suggest you learn from the 15 years of website design experience we have and follow these quick tips.

  1. Add an IMAGE to every single News Post and Informational Page that you can. This has been proven to boost website traffic as well as stickiness (how long a visitor stays on your website)
    Need some Image Tips?
  2. Keep your Images the Same Size. We would suggest using the thumbnail size option and consistently aligning the image to the left or right, your choice.
  3. Only change your Font Color for CRITICAL information. As fun as it is to make your website colorful, it also makes it hard to read and look 2nd tier. We would suggest using the build in colors unless you have to call out some very important information.
  4. Use Paragraphs. We know, it sounds silly, but when possible, don’t put more than two or three sentences together without a new paragraph. Your readers will thank you.
  5. Upgrade to Premium. Unlock the Premium Themes and Features Digital PTO has to offer and make your website even more professional and useful.

Welcome Again to Digital PTO!

We so glad to have your group as a member and we will continue to build and develop our service to meet as many of your needs as possible! Enjoy your new website!


What if I get stuck? How do I find help?

Digital PTO offers a variety of ways to get assistance when you are stuck. All of our members (Free & Premium) have access to our Help Center and our Premium Members have access to quick email support.

How to Access Help.

We are here to help in any way we can. Here are the best places to find assistance quickly.

  • Digital PTO Help Center – Our Help Center is LOADED with information about managing your website. With over 100 articles and tutorials (including Video Training) this is the very best place to start your search for answers.
  • Ask a Support Expert – Our Support Experts are available to help you via email during normal business hours. Priority attention is given to Premium Members, but even Free Plan Members can contact us with questions.

Access our Learning Center

If you would like to learn more about how to use Digital PTO's functionality, head to our Help Center for a wealth of knowledge not covered in this Quick Start Guide. Learn more about adding Images, Uploading Documents and more.

Access the Help Center

Premium Plan Help Center

If you are a member of our Premium Plan we have an entire Help Center dedicated toward our advanced and premium features. Learn how to set up your Events Calendar, request your custom Online Family Registration Form and more.

Access Premium Support

Not a Premium Plan Member?

Unlock the pull power of Digital PTO when you subscribe to our Premium Plan. Activate Events Calendars, Online Family Registration Forms, Premium Contact Forms, Premium Themes, direct Premium Email Support and much more.

Activate Premium Plan